Showing posts with label cherry. Show all posts

Tuesday, March 22, 2016

Making a Custom Keyboard Part 3: DONE!

Custom Keyboard Project Summary Page

It has been a while since my last post, but I have actually been done with my keyboard for some time. Now that I have a moment, I will finally post the update!

Here is the final layout I settled on:

I have been using and tweaking this layout for close to 4 months now, and it is getting close to how I think I will leave it. There is still some fiddling to do with how mode works and some of the symbol keys, but overall, it is really close.

Here are some pictures of the final product:

Ah, ain't she pretty!

So, for those who really want to know, here is the step-by step building process:

Step-By-Step Build


Step 1 - Design

I feel like I have beat this dead horse enough... go check out parts 0 through 2 for this step. Overall I mostly used http://www.keyboard-layout-editor.com/ in the end. I started with other tools, but this one is just faster and easier to mix things around.

Step 2 - Laser-Cut the Acrylic Case

I got access to the laser cutter up on campus. They let anyone get swipe-card access, so long as you fill out the paperwork. Hopefully you have some way to get access like this, it is an amazing machine that is super fun to use.
If you cannot get access to a laser cutter, you can always have the parts made for you by a company that does laser cutting. That will, of course, be more expensive.

To laser cut your piece, you simply need to make a vector graphics image of what it should cut. The laser cutter here would cut all the way through for "hairline" lines, and then do etching for any kind of gradient. I wanted to get mine done quick, so I stuck with all hairline cuts.

Here is what my vector image looked like:

*See the apendix if you want the inkscape file

The layers stack starting in the bottom left, moving up the left column, and then going from bottom to top on the right column. I will refer to them by their number, starting with 1 as the bottom piece. 
Layer 1 through 5 (the left column) and layers 7, 9, 10, and 11 were all cut into 0.06 in. (1.5mm) acrylic. (I used "12in. x 48 in. Acrylic Wire Shelf Liner (4-Pack)" for $31 from home depot.) I made duplicates of layers 9 and 11. (9 as a backup, since that's the most important piece, and 11 so one could go above, and one below the suit piece of layer 10.)
Layers 6 and 8 were cut into a spare piece of acrylic that was about 0.22 in. (5.6mm) thick. These layers are the main support layers for the switch mounting layers (7 and 9.) WARNING: Without these support layers, the switch mounting plates will break. I broke one just pushing the switches in and pulling them out a few times as I played with different switch profiles. You may be able to cut the support layers out of the same one you used for all other layers, and just double them up. I don't know, though, as I have not tried it.

Here are some pics of the final cut layers (Note, there is a tab in the top center of some of these, I removed that later and put in another key. It was a last minute change, but I designed it so I could do that. I was going to have my indicators top center, but changed my mind. Also note that I did not originally laser-cut the corner wholes in. I tried that later and it totally worked! Really well too!)
The thinner layers 1, 2, 3, 4, 5, 7, 9, 10, and 11:
Switches mounted on layers 7 and 9:
A stack of the thinner layers (top view on top, bottom view on bottom):
(I apologize, apparently I don't have pictures of just the thick pieces... oh well)

After cutting out all the layers, I found the posts I wanted at ace hardware and bolted it all together:

Step 3 - Soldering

This part takes, by far, the longest.
To save some cash, I just grabbed the nearest CAT5 (Ethernet) cable and pulled that apart. That gave me plenty of colors to work with for dirt cheap! You will also need some diodes if you wish to stop the ghosting effect (explained here, if you care...)
I recommend following the first few steps in the excellent guide created by matt3o on deskauthority.net found here:
Perhaps one day I will rewrite that part here for the sake of completeness, but I don't think I will today.
NOTE: When following the guide above, try to make sure you do your rows all the way across and your columns all the way down. I thought I would save some pins by trying to make mine as close to a square as possible. I ended up wiring the left and right halves as separate rows. While I saved some pins, it really just made the firmware step more complex and ugly. I was going to use the extra pins for some LED's but sticking to the rows and columns would have been just fine.

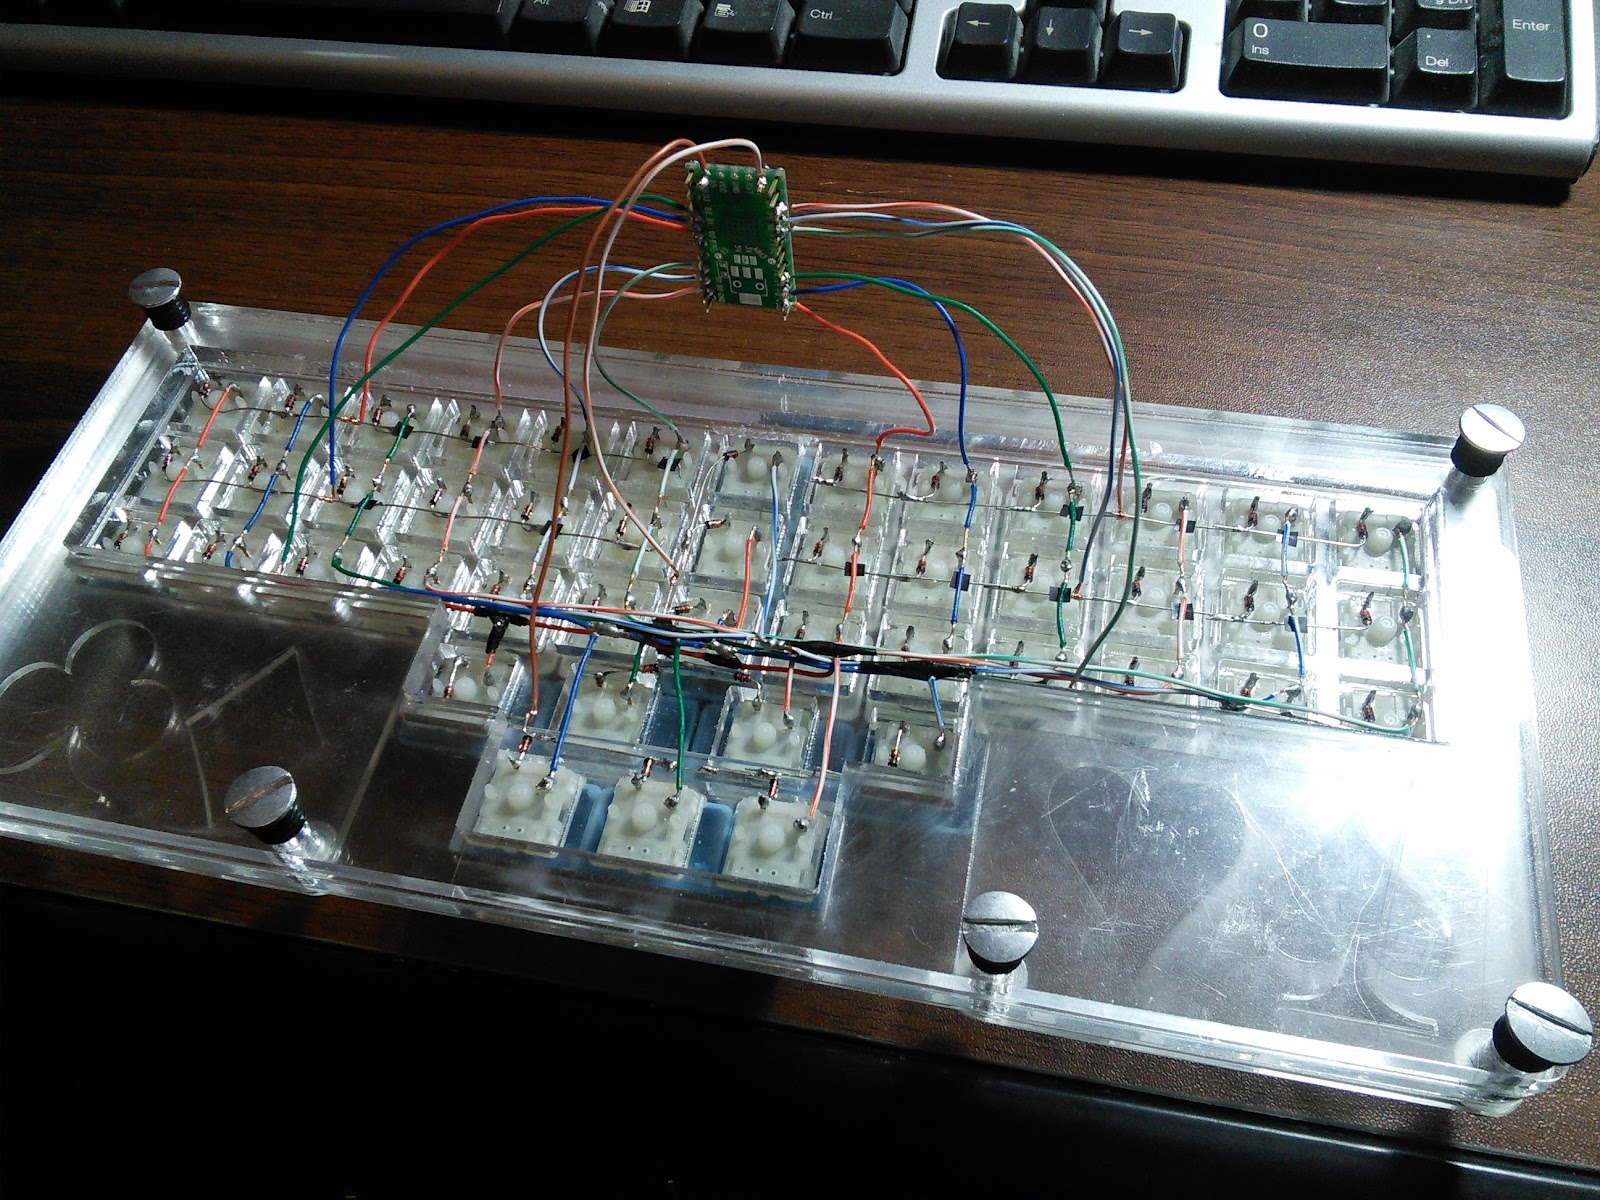
Here is a photo of my final wiring (Yeah, not toOOoo pretty, but I am a coder, not a hardware guy...)

Once all the columns and rows are soldered up good, you need to attach them to your microcontroller. Again, I used the Teensy 2.0 from PJRC. (That is what the firmware section below is aimed at too, so you might want to just use that one, unless you know what you're doing.)

Wire each row to a pin and each column to a pin on the Teensy 2.0.
NOTE: I messed up here again. I was looking at the keyboard upside-down for so long, that I forgot that I was looking at things backwards. I lined up my pins so nicely to follow a numerical, logical order, only to discover that they were all backwards. This doesn't matter too much, however, since the firmware has you put in the row-pin col-pin assignments. So... don't over think it. Just make sure you know what is hooked where.

Here are some pics of the teensy wired into the my keyboard:
And, putting it all together:
Note that I also ended up drilling a small (poorly lined up) whole in the bottom of the keyboard for quick access to the Teensy reset button. This made tweaking the firmware much faster, easier, and safer, as I didn't have to keep taking the thing apart anymore.

Step 4 - The Firmware

Surprisingly, this part was pretty easy. I had no soldering errors, so that helped, but overall, most of the work is done for you.
Once again, I would like to turn you over to matt3o. He has a great guide on using the TMK keyboard firmware:
Again, I may return to write up my own guide for the firmware, but for now, this suficeth me.

Step 5 - PLAY!!!

It's alive!


Now you can put away that old T.Oliver and be a high roller with your crazy custom keyboard (You are making an AlphaGrip, aren't you?)

If you do make one, send me a pic! I would love to see it.


Appendix

matt3o's guide. (I used this for most of the process. Thanks matt3o!)
Cherry MX datasheet (PDF) (if link breaks, just google "Cherry MX datasheet")
- This has all the dimensions of the switch. There are two main types, plate mounted and pcb mounted. If you are doing the method above, you want plate mounted. (The pcb mounted ones do not have the clips to hook into a plate, but are fastened purely by soldering them to a PCB.)
- Many other switches have the same profile. I used Gateron switches, which fit perfectly into the cherry-cut slots.

Laser Cutter file for inkscape (SVG) (CC Non-commercial share-alike, contact me if you want commercial license. I will let you have it for free, I just want to know when commercial folks are using it.)
- Some laser cutters don't like Inkscape files. I had to export the file as a pdf, then import the pdf into Corel Draw. From there, I ungrouped the items and changed all lines to "hairline" in Corel Draw. After lining things up with how I wanted them on the piece, they were ready to print!

Teensy 2.0 Purchase Page
Teensy 2.0 Pinout Sheet (PDF)

Friday, April 17, 2015

Making A Custom Keyboard Part 1

Custom Keyboard Project Summary Page

I have started building my own custom keyboard. Have just finished the design phase and have purchased all the parts I need to make it. The following is a more detailed description.

I started by designing the keyboard I wanted to build in Inkscape. I drew everything to scale so I could measure and get exact amounts for everything. My original design looked something like this:


I continued to modify and tweak things. I built a crappy cardboard prototype with keys pulled off an old keyboard and finally came to the following design:


Yeah, a bit of a change... By making the keyboard under 12" wide and reducing the number of keys to 68, I was able to knock close to $100 off the end price. DEFINITELY design and redesign everything while hunting for materials. You can save yourself a lot of money.

Here is the price breakdown (price before shipping in parenthesis if there was shipping costs):
- Colored Keycaps: $30 ($25)
- Teensy 2.0: $16 ($19.03)
- Acrylic Case: $40.64
- 70 Cherry MX Blue switches: $80.25 ($65.10)
- 80 (1N4148) Diodes: $3.00
- Cat5 7ft cable (for colored wires): $1.36
- USB 2.0 to Mini-B 5-pin 6ft cable: $1.41
--- (shipping for cat5 and usb2.0 was $5.99 together)
Total costs: $178.65

NOTE: I am sure I have forgotten something... but this is a good initial cost point. Here is some more information on where I got things and the details about each part:

Colored Keycaps - $30 ($25)

A couple notes first. If a keyboard has a horizontal rectangle for an enter key, it is ANSI. If it has a upsidown L-ish shaped enter key, it is ISO.
There are two main types of Keyboard Profiiles for cherry keycaps. The ones with different shapes for each row are often known as OEM, Standard Profile, or DCS and will talk about R1, R2, etc. for which row that key will fit on (due to it's shape.) The non-shaped keys that will be the same for the whole board are often called DSA or flat keys. Be aware when buying your keys which rows are where or you may end up with a layout that has a jagged set of keys.
I purchased mine from MaxKeyboard. They seemed to have the best price for getting a full set of keys. For the above design I got an "Custom Color Cherry MX Full Replacement Keycap Set (Blank)" with ANSI 104-key full size set. I got the one with the 6.25 spacebar so that I could get the extra 1.25 control keys for the bottom row of my keyboard. (The 6.0 comes with smaller special keys and bigger control keys. See the description on their site. It is a good one.)
The full set like this gives me way more keys than I need, but any other deals would have costed a significant amount more. The above design needs 60 1x1 keys (The size of standard letter keys,) 6 1x1.25 keys (the size of the alt key on most keyboards,) and 2 1x1.5 keys (one and a half the size of a letter key. The size of the tab key on most keyboards.)
The big colored pack gives me all those keys and enough to replace the top row and a few others with blue if I want. This pack also ensures that the profiles for each row will be nice and tidy. The only ones that will be a bit off will be the spacebar and the shift key. This bothered me for a moment, then I decided I wanted the space and shift to stick a bit above the row above it.

Teensy 2.0 - $16 ($19.03)

I did not do too much reading or research on this one. Every custom keyboard guide I looked at online used this one. It seemed like the standard for custom keyboard controllers. There are even some really easy pre-written code things out there, apparently. This seems like a fairly no sweat buy. You can get them cheap straight from their maker: PJRC

Acrylic Case - $40.64

I don't have much to contribute here. The acrylic sheets I have found are all surprisingly expensive. If you have a cheaper way to make a case, let me know. I went with the layers approach described in this guide(in case that link breaks, it just talks about cutting out layers and stacking them up to make the case.) The Cherry MX switches will come in two types: MX1A-xxNN and MX1A-xxNW. The NN switches are meant to be attached to a 1.5mm mounting thing where the NW ones are meant to hook straight to a PCB (circuit board). I mention this here because you will need to get at least one sheet of acrylic that is 1.5mm for the switches to hook into if you are not using a pcb. I found shelf liners on Home Depot's website that fit the bill for my keyboard. From one sheet I could get close to a 3/4" case (and it comes with 4 sheets.) The sheets are actually 0.06" thick, but I figure I can sand them down a bit if that doesn't fit the 1.5mm switches.
Other case options: Most people follow a format similar to some other keyboard. In that case you can simply buy one of those and use the case from it. You may even be able to find a broken one for cheap.

70 Cherry MX1A-E1NN (Blue) switches - $80.25 ($65.10)

I got these with the diodes off of AlliedElec at a bulk rate. If you are getting the normal 104, your cost will be even cheaper per switch. I kinda wanted the brown MX1A-G1NN switches, but everywhere that has them cheap are out of them. If you want to know the difference between the MX switches, there are lots of videos online. Here is a summary of what they are so you are not going out there blind. There are three main types of actions available: Linear, Bump, Bump&Click.
Linear goes down and up at a constant pressure application level. This is supposedly better for gaming and things where you will be holding the key down or doing non-traditional presses with it.
Bump has a slight bump as you press down. This tactile feedback lets you know when the key registers. This is a good all-around key for typing and gaming.
Bump and Click keys are bump keys that also make a click sound when the key registers. These are the most "fun" to type with. They are meant for typing.
Please note that in some of the sound test videos the users are pressing to hard and are creating a "clack" for all keys. This is from the switch bottoming out. That is not the same as the click. There are little bumper rings and pads you can buy to get rid of the clack (if it bothers you) or you can just learn to type with the right amount of force (recommended.)
Within the three categories of linear, bump, and bump&click, there are several choices. Each category will have various switches with different amounts of "actuation force." Reds (Linear), Browns (Bump), and Blues (Bump and Click) are the lightest in each category. These are what you would choose for your letter keys unless you are super heavy handed. Spacebar and some modifiers (and Esc) are usually heavier switches (Unless using multiple switches for the spacebar.) Yeah, thumbs are heavy.
I purchased all blues, as I plan on this being a programming keyboard and I wanted the cheap bulk prices. I may purchase heavier switches for some keys later after I have got a feel for things.

80 (1N4148) Diodes: $3.00

I got these from AlliedElec with my cherry switches. Just search for 1N4148 and they should come up. Diodes are needed to prevent "Ghosting." This is where extra keys can be typed that you never touched. For more info on that see the wiring guide here. It is good and makes sense

Cat5 24awg 7ft cable (for colored wires) - $1.36

It is good to have different colors for wires. Most spools are huge and expensive. One tutorial then mentioned that you can use cat5 cables from Monoprice and I was like "BRILLIANT!" As for the gauge of wire, I have seen suggestions from 20 to 24 awg. I don't know much about wire, so if someone has a more exact answer, please let me know.

USB 2.0 to Mini-B 5-pin 6ft cable (for Teensy): $1.41

The folks at PJRC do not provide a USB cable, so I picked up a 6ft one on Monoprice when I got my cat5 cable.

Until Part 2...

Well, that is all I have for now. I have ordered by parts and they will be coming in the next few weeks. I will post more instructions as I complete them. Hope this helps someone out there who is a total nerd like me.

Also, If anyone actually wants my inkscape design files, let me know. I will gladly share them.